How to Inspect CS2 Skins? An Ultimate Guide
Whether you’ve been playing CS2 for a long time or just started, inspecting skins in CS2 is not always as straightforward as it seems! Anyone can look at their own skins, but how do you look at skins you don’t have? How to look at what you plan to buy? Or how about taking a look at a very expensive and cool butterfly knife that you don’t have? Today, we will give answers to all these questions and teach you how to independently inspect any CS2 skins in the game!
Why You Should Inspect CS2 Skins?
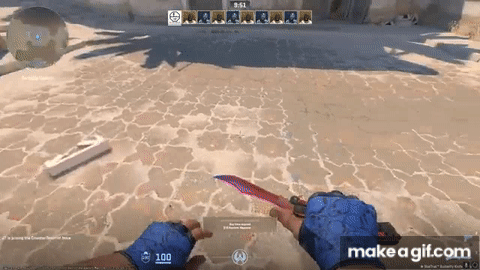
Let’s start with the concept of “Inspect” and what it means in the world of CS2. To inspect CS2 skins is the process when, during a game or warm-up, you press the “F” key by default settings, and your agent starts to look at the weapon. He shows one side, then the other. This allows you to see in much more detail everything that is depicted on the skin. This technique is especially used when playing with a knife because some knives can be flipped, spun, or something similar during inspection.
You can inspect CS2 skins to get a closer look at the recently received skin or check out a skin you would like to buy or simply like.
To begin with, let’s talk about how to inspect CS2 skins in the game you already have!
How to Inspect CS2 Skins In-Game
In order to inspect CS2 skin, of course, you first need to enter the game. Once you’re in the main menu, click on “Inventory.” Then, in your inventory, find the skin you want to take a look at and right-click on it.
You’ll see a menu pop up with various options, but the one you’re looking for is “Inspect.”
Pay attention that throughout CS2 inspects, there will be three variations of inspection at the bottom. The first is an inspection of the skin in the air. You can rotate it as you like and look at it from different angles.
The second option is an inspection of the skin in the agent’s hands, this is the basic inspection as it is done in the game itself, so you will not need to load onto any server to inspect your CS2 skin. You can do it in your inventory. The third option is how your agent looks with this skin from another player’s perspective, essentially how others will see you.
Besides this, you can also use CS2 inspects in the Steam marketplace. To do this, you need to open Steam and go to the “Market” section. Here, select CS2, and in the search bar, write the name of the skin you want to look at. In the resulting list, you will see many skins that different users are selling. Choose any one of them and click on the skin itself to see its details, and you’ll find an “Inspect in Game” button.
After you click this button, Steam will automatically launch the game and start the preview of this skin. If you want to try to look at another skin, all you need to do in the game is return to the main menu and go back to Steam. Choose a new skin you want to preview and enjoy CS2 inspects.
However, this is not the most user-friendly way. Firstly, the Steam market is frankly outdated, and the search filter is very inconvenient. Also, in this way, you will be able to inspect CS2 skins that are not for sale, and you will not be able to filter in detail by stickers or in any other way.
A better and alternative way to inspect skins is using third-party websites, which we will discuss below.
How to Use a CS2 Skin Inspect Server?
To start using special CS2 inspect servers for skins is quite simple. You only need to do a few simple things. First, you need to enable the developer console.
If you haven’t enabled it yet, here are step-by-step instructions on how to do it:
- Go to the main menu
- Select “Settings”
- Navigate to the “Game” tab
- Choose “Yes” next to the enabling developer console option
When you have enabled the developer console, you will have more possibilities not only with CS2 inspects but also with many other things. For example, professional players manually customize their crosshairs through the console.
Now, it’s worth understanding which of the two ways you want to use because there are several options.
The first option is – Workshop maps. You can choose one map in order to have a nice background for inspecting your skin. For example, the map “Inspect Skins” is very popular precisely because of the large number of different locations where you can take screenshots or simply admire the skins.
In addition to Workshop maps, it is also possible to connect to an existing server.
In this case, you need to open the console and enter one of these commands:
- connect inferno.epidemic.gg
- connect nuke.epidemic.gg
- connect dust2.epidemic.gg
- connect vertigo.epidemic.gg
- connect mirage.epidemic.gg
- connect siege.epidemic.gg
- connect biome.epidemic.gg
- connect thera.epidemic.gg
- connect overpass.epidemic.gg
- connect ancient.epidemic.gg
- connect italy.epidemic.gg
- connect office.epidemic.gg
- connect anubis.epidemic.gg
- connect memento.epidemic.gg
- connect lostcoast.epidemic.gg
Whichever option you choose, you should understand that the skins you want to use need to be found on a special website, and then on the server, enter a specific command to get what you want.
Sounds a little complicated, right? However, let’s break down what you need to do step by step!
Step-by-Step
First, go to one of those maps that we wrote above. You can do this through the developer console. Open it and paste “connect nuke.epidemic.gg” or another map.
As soon as you have loaded in, you can proceed to the next step, namely choosing the skin you want to inspect. You can simply do it on cs2inspects.
Go to the “GenCodes” section, and here, select the weapon you like. This can be done using filters or a simple search by name.
Once you have selected everything you need: weapon, gloves, knife, and agent, click the “Make Combo” button.
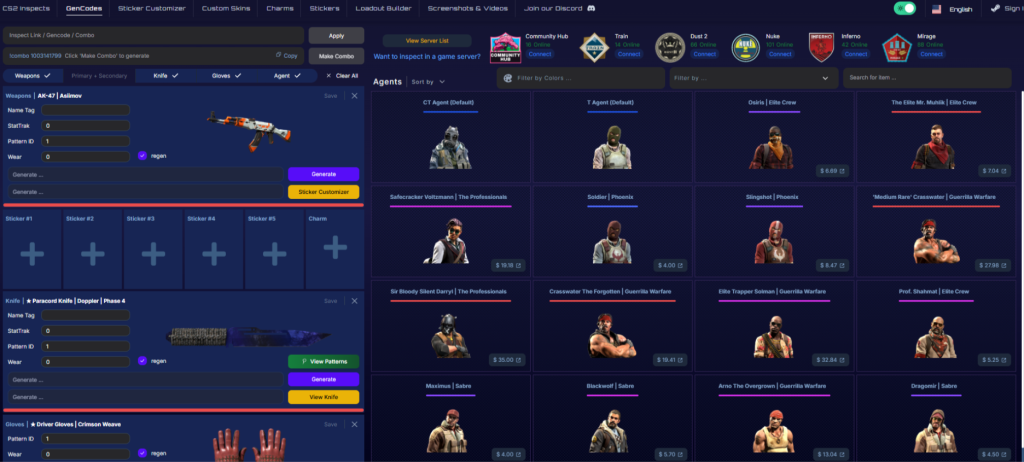
As soon as you click that button, a code will instantly appear, looking something like this: !combo 1003141799
Copy this code and go back to the server. Here, open the chat and paste this command. Your complete loadout will automatically appear in your agent’s hands.
But honestly, that’s quite a bit of trouble, wouldn’t you agree? That is why web-based versions have become more popular lately, where you don’t need to run anything, create code, and do other nuances. We will talk about this below.
Tools/Websites
Looking at a skin through a website is definitely easier and significantly faster. This feature hasn’t been around for very long, but it’s becoming more and more popular every month. Now, almost every website that focuses on skins offers some kind of functionality to let you see the skins.
Let’s take ShadowPay, for instance. It’s one of the most well-known and popular sites for trading skins.
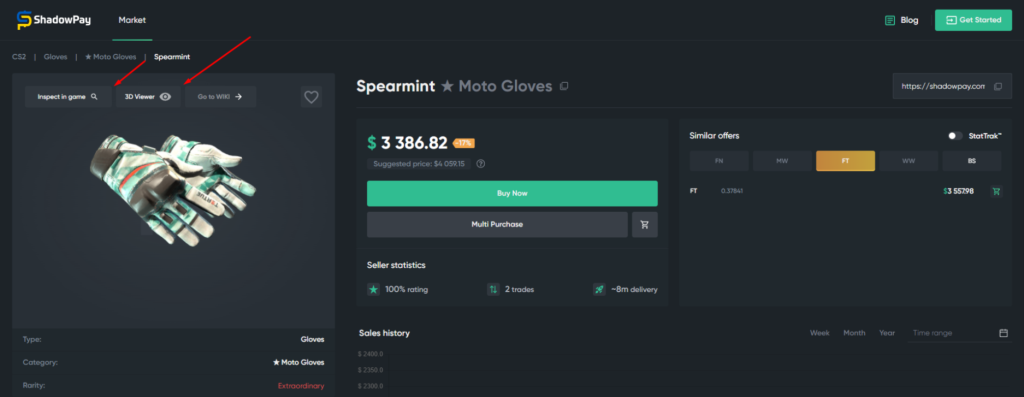
As seen in the photo, there is an option here to click on two buttons. The first, “inspect in game,” will automatically launch your game, and you will be able to examine this skin more closely in the game.
The second button, “3D view,” opens an extra window on the website where you can view the skin from all angles. You can rotate it, zoom in, and examine it however you need.
Thanks to the fact that you do not waste extra time and can immediately inspect the skin, the web version is so popular. Try using the skin inspection from ShadowPay, and you will be pleasantly surprised.
Wrapping Up!
Inspecting CS2 skins is very important because it lets you get closer acquainted with the author’s work or choose a skin you want. That’s why we’ve aimed to explain the easiest ways to inspect skins and showcase the best options available, so feel free to choose the skins you find appealing.
To learn more about the world of CS2, stick around and explore our blog.
What are some advanced CS2 skin inspection tactics?
The most convenient and up-to-date way to inspect a skin is by viewing it on a website. Often, sites that specialize in selling skins create user-friendly and fast 3D models that allow you to see the skin from every angle. For instance, on ShadowPay, you can select a skin and click on the “3D review” option.
What to look for when inspecting a skin?
Well, you should first look at the entire skin at once and understand your overall impression. If it is generally appealing to you, try to examine the part of the weapon that will most often be in front of your eyes. Perhaps you will find something you like or some details that emphasize the skin. Also, if you’re getting skin that isn’t Factory New, check the wear and tear closely to see if it bothers you!


Share to: